AWS Site-to-Site VPNを設定した際、AWS側からVPNサンプル設定をダウンロードできます。
AWSと対向するネットワーク機器用に出力するサンプル設定なのですが、中身が英語だし所々修正が必要だし、っと英語が苦手な自分にとってはあまり親切なファイルではありません(汗
本記事では、VPNサンプル設定の日本語化 & ネットワーク機器の表記に合わせて修正をしてみたいと思います。
・・・日本語化とか翻訳とか言ってますが、Google翻訳様に頼りきっています(汗
目次
検証環境
- 検証日: 2022/09/25
- 実行環境
- PC
- Windows10 Home Ver21H1
- Google Chrome: バージョン: 105.0.5195.127(Official Build) (64 ビット)
- Windows10 Home Ver21H1
- VPNネットワーク機器
- Fortigate50E: FortiOS6.2.11
- PC
注意事項
- 本記事の内容は
Fortigate50E: FortiOS6.2.11で検証しています。 - 翻訳はGoogle翻訳を利用し、所々実機を元に修正しています。
- コマンド内の変数やパラメータやは検証で使用したものを記載しています。ご自身の環境に合わせ、書き換えて使用してください。
- 個人で検証しているため実行結果に責任は持てません。必ずご自身でも検証してから使用してください。
1. AWS側のVPN設定
今回の目的はVPNサンプル設定の翻訳のため、AWS側の設定については省略します。
別の記事でVPN接続を書いたものがあるので参考として貼ります。
■ VPNサンプル設定の内容に関わる部分だけAWS設定を記載します。
| AWSリソース | 項目 | 設定値 | 備考 |
|---|---|---|---|
| ルートテーブル | ルート | 宛先: 192.168.0.0/16、ターゲット: VGW | Fortigate配下ネットワークCIDR含む、広い範囲で記載 |
| カスタマーゲートウェイ | IPアドレス | ※FortigateのグローバルIPアドレス | |
| カスタマーゲートウェイ | BGP ASN | 65000 | BGP不使用のためデフォルト値 |
| Site-to-Site VPN接続 | ルーティング | 静的(Static) | |
| Site-to-Site VPN接続 | ローカル IPv4 ネットワーク CIDR | 0.0.0.0/0 | 制限しない |
| Site-to-Site VPN接続 | リモート IPv4 ネットワーク CIDR | 0.0.0.0/0 | 制限しない |
| Site-to-Site VPN接続 | 静的 IP プレフィックス | 0.0.0.0/0 | WEBで見ると0.0.0.0/0使わない人が多数(汗 |
| Site-to-Site VPN接続 | トンネル 1 オプション | デフォルトを使用 | |
| Site-to-Site VPN接続 | トンネル 1 オプション | デフォルトを使用 |
2. VPNサンプル設定
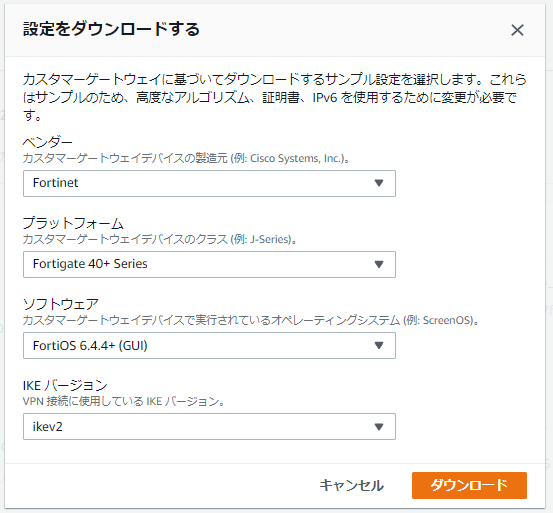
2.1. VPNサンプル設定のダウンロード
以下の内容で出力しました。
| 項目 | 設定値 | 備考 |
|---|---|---|
| ベンダー | Fortinet | |
| プラットフォーム | Fortigate 40+ Series | 検証機は Fortigate50E |
| ソフトウェア | FortiOS 6.4.4.+ (GUI) | 検証機は 6.2.11 で 6.4未満 |
| IKEバージョン | ikev2 |
2.2. 読み替え/置換が必要な箇所
出力したVPNサンプル設定を実際に使用する際、「読み替え/置換」が必要な箇所です。
本記事中の以下パラメータの部分で、本記事では参考値を使用しています。
■ IPsecトンネル のパラメータ
| トンネル番号 | 項目 | パラメータ | 原文内の検索ワード |
|---|---|---|---|
| Tunnel 1 | 外部IP AWS側 | 1.1.1.1 | 「c. IP address: 」で検索の1つ目 |
| 〃 | 内部IP AWS側 | 169.254.1.1 | 「b. Remote IP」で検索の1つ目 「set server」で検索の1つ目 |
| 〃 | 内部IP 機器側 | 169.254.1.2 | 「a. IP :」で検索の1つ目 |
| 〃 | 事前共有鍵 | xxxxSharedKeyxxxTunnel_1xxxxxxxx | 「h. Pre-Shared Key:」で検索の1つ目 |
| Tunnel 2 | 外部IP AWS側 | 2.2.2.2 | 「c. IP address: 」で検索の2つ目 |
| 〃 | 内部IP AWS側 | 169.254.2.1 | 「b. Remote IP」で検索の2つ目 「set server」で検索の2つ目 |
| 〃 | 内部IP 機器側 | 169.254.2.2 | 「a. IP :」で検索の1つ目 |
| 〃 | 事前共有鍵 | xxxxSharedKeyxxxTunnel_2xxxxxxxx | 「h. Pre-Shared Key:」で検索の1つ目 |
※「原文内の検索ワード」は、原文のどこに記載されているか探すための検索ワードです。原文は先にTunnel 1、次にTunnel 2と記載されているため、検索HITの1つ目がTunnel 1、2つ目がTunnel 2のパラメータです。
■ インターフェース番号
原文内でAWSとVPNを張るインターフェースが「wan1」となっています。環境によって異なる場合は読み替え/置換が必要です。
■ AWSリソース ID
| AWSリソース種別 | ID | 原文内の検索ワード | 備考 |
|---|---|---|---|
| VPN接続 ID | vpn-fffffffffffffffff | Your VPN Connection ID | 項番 2.3. 参照 |
| 仮想プライベートゲートウェイ ID | vgw-01234567890abcdef | Your Virtual Private Gateway ID | 使用していないので無視 |
| カスタマーゲートウェイ ID | cgw-01234567890abcdef | Your Customer Gateway ID | 使用していないので無視 |
2.3. そのまま入力できず注意/修正が必要な箇所
VPNトンネルインターフェースの名前にVPN接続 IDを指定する箇所がありますが、長すぎてFortigateで設定不可です。
そのため、以下の修正が必要です。 ※所々赤字で書いてる箇所です。
| VPN接続 ID | 本記事での仮名前 | 備考 |
|---|---|---|
| vpn-fffffffffffffffff-0 | vpn-to-aws-1 | 環境に合わせて変更 |
| vpn-fffffffffffffffff-1 | vpn-to-aws-2 | 環境に合わせて変更 |
また、2箇所 CLI操作が出てくるのですが、どちらも設定不可(コマンドが無い)でした。
検証機が「Fortigate50E: FortiOS6.2.11」だからというのもあるようですが、CLIを実行しなくてもVPN接続はできるので、実行できないなら無視しても良いかもしれません。
3. VPNサンプル設定の原文
原文は長いので折りたたんでいます、クリックで展開。
! Amazon Web Services
! Virtual Private Cloud

! AWS utilizes unique identifiers to manipulate the configuration of
! a VPN Connection. Each VPN Connection is assigned an identifier and is
! associated with two other identifiers, namely the
! Customer Gateway Identifier and Virtual Private Gateway Identifier.
!
! Your VPN Connection ID                      : vpn-fffffffffffffffff
! Your Virtual Private Gateway ID         : vgw-01234567890abcdef
! Your Customer Gateway ID                  : cgw-01234567890abcdef
!
!
! This configuration consists of two tunnels. Both tunnels must be
! configured on your Customer Gateway.
!
! --------------------------------------------------------------------------------
! IPSec Tunnel #1
! --------------------------------------------------------------------------------
! #1: Internet Key Exchange (IKE) Configuration

Go to  VPN --> IPSEC Tunnels --> Create New (drop down) --> Select IPSEC Tunnel

VPN Creation Wizard Window appears

Select Template Type as “Custom”

Provide a Name for the VPN connection (Name must be shorter than 15 chars, best if shorter than 12): vpn-fffffffffffffffff-0

New VPN Tunnel Window Appears (Here we configure the VPN settings):

Under “Network” Section:
a. IP Version:     IPv4
b. Remote Gateway: Static IP Address
c. IP address: 1.1.1.1
d. Local Interface: wan1
e. Local Gateway: Select Specify and enter WAN port IP (Public IP)
f. Dead Peer Detection: Enable by selecting On Idle/ On Demand
g. Authentication Method: Pre-shared Key
h. Pre-Shared Key: xxxxSharedKeyxxxTunnel_1xxxxxxxx
i. IKE Version: 2
Phase 1 Proposal:
j.  Encryption: aes128
k. Authentication: sha1
l. DH group: 2     ! and deselect 5
m. Keylife: 28800 seconds

! NAT Traversal is enabled by default but if your FortiGate device is not behind a NAT/PAT device, please deselect NAT Traversal.

! --------------------------------------------------------------------------------
! #2: IPSec Configuration

Under Phase 2 Selectors --> New Phase 2
a.  Name:  vpn-fffffffffffffffff-0
b.  Local Address: LAN subnet behind Fortigate/0.0.0.0/0
c.  Remote Address: AWS Private Subnet/0.0.0.0/0

Under Advanced
d.  Encryption: aes128
e.  Authentication: sha1
f.  Select Enable Replay Detection
g.  Select Perfect Forward Secrecy
h.  DH Group: 2 ! and deselect 5
i.  Keylife: 3600 seconds
j.  Enable Auto-negotiate   ! Autokey Keep Alive is enabled automatically when Auto-negotiate is enabled
k.  Click Ok

! --------------------------------------------------------------------------------
! #3: Tunnel Interface Configuration

! A tunnel interface is configured to be the logical interface associated
! with the tunnel. All traffic routed to the tunnel interface will be
! encrypted and transmitted to the VPC. Similarly, traffic from the VPC
! will be logically received on this interface.
!
!
! The address of the interface is configured with the setup for your
! Customer Gateway.  If the address changes, the Customer Gateway and VPN
! Connection must be recreated with Amazon VPC.
!
! This is required in order for tunnel failover via gwdetect to function
!
! Perform this from the Global VDOM.

Go to Network Tab --> Interface --> wan1 and edit vpn-fffffffffffffffff-0

a. IP : 169.254.1.2
b. Remote IP: 169.254.1.1/30
c. Select Ping
d. Administrative Status: Up
e. Select Ok.

!You can set MTU and MSS on the tunnel by performing this from the CLI:
 config global
 config system interface
  edit "vpn-fffffffffffffffff-0" ! This name will be the same as the VPN tunnel name
    set mtu-override enable
    set mtu 1427
    set tcp-mss 1379
   next
end

! --------------------------------------------------------------------------------
! #4 Static Route Configuration
Your Customer Gateway needs to set a static route for the prefix corresponding to your
! VPC to send traffic over the tunnel interface.
! An example for a VPC with the prefix 10.0.0.0/16 is provided below:
!
! This is configured from the root VDOM


Go to Network Tab --> Static Routes --> Create New

a. Destination: Subnet (10.0.0.0/16)
b. Interface: vpn-fffffffffffffffff-0 ! This is the VPN tunnel interface
c. Click Ok

! Static routing does not allow for failover of traffic between tunnels. If there is a problem with one of the
! tunnels, we would want to failover the traffic to the second tunnel. This is done by using "gwdetect" in fortigate.
! The gwdetect command will ping the other end of the tunnel, and check if the tunnel is up. If the pings fail, it will
! remove the static route from the routing table, and the second route in the table will become active.
!
! This can be done only using the CLI.
!
! The following config will tell the Fortigate device, what IP it should ping to test the tunnel. This IP should be
! the inside IP address of the virtual private gateway.
! This is required in order for tunnel failover via gwtect to function. Additionally, this is required to keep the tunnel up, since
! traffic must be sent from your side of the VPN tunnel to prevent the tunnel from being taken down.

config vdom
    edit root
        config router gwdetect
        edit 1
        set interface "vpn-fffffffffffffffff-0" ! This is the VPN tunnel interface
        set server "169.254.1.1"

! server IP is the AWS inside IP

! Using the following command, you can set the interval and failtime for gwdetect. Interval is number of seconds
! between pings. Failtime is the number of lost consecutive pings.Using the respective values of 2 and 5, your tunnel
! will failover in 10 seconds.

        set interval 2
        set failtime 5
    next
end

! --------------------------------------------------------------------------------
! #5: Firewall Policy Configuration
! Create a firewall policy permitting traffic from your local subnet to the VPC subnet and vice versa
! This example policy permits all traffic from the local subnet to the VPC.
!
!This is configured from the root VDOM


Go to Policy & Object tab --> Firewall Policy --> Create New

   a. Provide a Name for the Policy
   b. Incoming Interface/Zone = internal ! This is the interface out which your local LAN resides
   c. Source Address = all
   d. Outgoing Interface/Zone = "vpn-fffffffffffffffff-0" ! This is the VPN tunnel interface
   e. Destination Address = all
   f. Schedule = always
   g. Service = ALL
   h. Action = ACCEPT
   i. Click OK

! NAT is enabled for the policy by default, you can disable it.

! Now create a policy to permit traffic going the other way

   a. Create New
   b. Provide a Name for the Policy
   c. Incoming Interface/Zone = "vpn-fffffffffffffffff-0" ! This is the VPN tunnel interface
   d. Source Address = all
   e. Outgoing Interface/Zone = internal  ! This is the interface out which your local LAN resides
   f. Destination Address = all
   g. Schedule = always
   h. Service = ALL
   i. Action = ACCEPT
   j. Click OK


! --------------------------------------------------------------------------------
! IPSec Tunnel #2
! --------------------------------------------------------------------------------
! #1: Internet Key Exchange (IKE) Configuration

Go to  VPN --> IPSEC Tunnels --> Create New (drop down) --> Select IPSEC Tunnel

VPN Creation Wizard Window appears

Select Template Type as “Custom”

Provide a Name for the VPN connection (Name must be shorter than 15 chars, best if shorter than 12): vpn-fffffffffffffffff-1

New VPN Tunnel Window Appears (Here we configure the VPN settings):

Under “Network” Section:
a. IP Version:     IPv4
b. Remote Gateway: Static IP Address
c. IP address: 2.2.2.2
d. Local Interface: wan1
e. Local Gateway: Select Specify and enter WAN port IP (Public IP)
f. Dead Peer Detection: Enable by selecting On Idle/ On Demand
g. Authentication Method: Pre-shared Key
h. Pre-Shared Key: xxxxSharedKeyxxxTunnel_2xxxxxxxx
i. IKE Version: 2
Phase 1 Proposal:
j.  Encryption: aes128
k. Authentication: sha1
l. DH group: 2     ! and deselect 5
m. Keylife: 28800 seconds

! NAT Traversal is enabled by default but if your FortiGate device is not behind a NAT/PAT device, please deselect NAT Traversal.

! --------------------------------------------------------------------------------
! #2: IPSec Configuration

Under Phase 2 Selectors --> New Phase 2
a.  Name:  vpn-fffffffffffffffff-1
b.  Local Address: LAN subnet behind Fortigate/0.0.0.0/0
c.  Remote Address: AWS Private Subnet/0.0.0.0/0

Under Advanced
d.  Encryption: aes128
e.  Authentication: sha1
f.  Select Enable Replay Detection
g.  Select Perfect Forward Secrecy
h.  DH Group: 2 ! and deselect 5
i.  Keylife: 3600 seconds
j.  Enable Auto-negotiate   ! Autokey Keep Alive is enabled automatically when Auto-negotiate is enabled
k.  Click Ok

! --------------------------------------------------------------------------------
! #3: Tunnel Interface Configuration

! A tunnel interface is configured to be the logical interface associated
! with the tunnel. All traffic routed to the tunnel interface will be
! encrypted and transmitted to the VPC. Similarly, traffic from the VPC
! will be logically received on this interface.
!
!
! The address of the interface is configured with the setup for your
! Customer Gateway.  If the address changes, the Customer Gateway and VPN
! Connection must be recreated with Amazon VPC.
!
! This is required in order for tunnel failover via gwdetect to function
!
! Perform this from the Global VDOM.

Go to Network Tab --> Interface --> wan1 and edit vpn-fffffffffffffffff-1

a. IP : 169.254.2.2
b. Remote IP: 169.254.2.1/30
c. Select Ping
d. Administrative Status: Up
e. Select Ok.

!You can set MTU and MSS on the tunnel by performing this from the CLI:
 config global
 config system interface
  edit "vpn-fffffffffffffffff-1" ! This name will be the same as the VPN tunnel name
    set mtu-override enable
    set mtu 1427
    set tcp-mss 1379
   next
end

! --------------------------------------------------------------------------------
! #4 Static Route Configuration
Your Customer Gateway needs to set a static route for the prefix corresponding to your
! VPC to send traffic over the tunnel interface.
! An example for a VPC with the prefix 10.0.0.0/16 is provided below:
!
! This is configured from the root VDOM


Go to Network Tab --> Static Routes --> Create New

a. Destination: Subnet (10.0.0.0/16)
b. Interface: vpn-fffffffffffffffff-1 ! This is the VPN tunnel interface
c. Click Ok

! Static routing does not allow for failover of traffic between tunnels. If there is a problem with one of the
! tunnels, we would want to failover the traffic to the second tunnel. This is done by using "gwdetect" in fortigate.
! The gwdetect command will ping the other end of the tunnel, and check if the tunnel is up. If the pings fail, it will
! remove the static route from the routing table, and the second route in the table will become active.
!
! This can be done only using the CLI.
!
! The following config will tell the Fortigate device, what IP it should ping to test the tunnel. This IP should be
! the inside IP address of the virtual private gateway.
! This is required in order for tunnel failover via gwtect to function. Additionally, this is required to keep the tunnel up, since
! traffic must be sent from your side of the VPN tunnel to prevent the tunnel from being taken down.

config vdom
    edit root
        config router gwdetect
        edit 2
        set interface "vpn-fffffffffffffffff-1" ! This is the VPN tunnel interface
        set server "169.254.2.1"

! server IP is the AWS inside IP

! Using the following command, you can set the interval and failtime for gwdetect. Interval is number of seconds
! between pings. Failtime is the number of lost consecutive pings.Using the respective values of 2 and 5, your tunnel
! will failover in 10 seconds.

        set interval 2
        set failtime 5
    next
end

! --------------------------------------------------------------------------------
! #5: Firewall Policy Configuration
! Create a firewall policy permitting traffic from your local subnet to the VPC subnet and vice versa
! This example policy permits all traffic from the local subnet to the VPC.
!
!This is configured from the root VDOM


Go to Policy & Object tab --> Firewall Policy --> Create New

   a. Provide a Name for the Policy
   b. Incoming Interface/Zone = internal ! This is the interface out which your local LAN resides
   c. Source Address = all
   d. Outgoing Interface/Zone = "vpn-fffffffffffffffff-1" ! This is the VPN tunnel interface
   e. Destination Address = all
   f. Schedule = always
   g. Service = ALL
   h. Action = ACCEPT
   i. Click OK

! NAT is enabled for the policy by default, you can disable it.

! Now create a policy to permit traffic going the other way

   a. Create New
   b. Provide a Name for the Policy
   c. Incoming Interface/Zone = "vpn-fffffffffffffffff-1" ! This is the VPN tunnel interface
   d. Source Address = all
   e. Outgoing Interface/Zone = internal  ! This is the interface out which your local LAN resides
   f. Destination Address = all
   g. Schedule = always
   h. Service = ALL
   i. Action = ACCEPT
   j. Click OK


! Additional Notes and Questions
!  - Amazon Virtual Private Cloud Getting Started Guide:
!       http://docs.amazonwebservices.com/AmazonVPC/latest/GettingStartedGuide
!  - Amazon Virtual Private Cloud Network Administrator Guide:
!       http://docs.amazonwebservices.com/AmazonVPC/latest/NetworkAdminGuide
4. Google翻訳と修正してみた
文中色分けの意味
通常文字色 = 設定操作する箇所
Green = 原文でコメントアウトの箇所
Blue = 記事を書いてて気づいた箇所やコメント
Red = 注意事項(そのまま設定しちゃダメな箇所)
! Amazon Web Services
! Virtual Private Cloud
! AWSは一意の識別子を使用して、VPN接続の構成を操作します。
! 各VPN接続には識別子が割り当てられ、他の2つの識別子、つまりカスタマーゲートウェイ識別子と仮想プライベートゲートウェイ識別子に関連付けられます。
!
! VPN接続 ID : vpn-fffffffffffffffff
! 仮想プライベートゲートウェイ ID : vgw-01234567890abcdef
! カスタマーゲートウェイ ID : cgw-01234567890abcdef
!
!
! この構成は、2 つのトンネルで構成されています。 カスタマー ゲートウェイで両方のトンネルを設定する必要があります。
!
4.1. トンネル 1本目
! --------------------------------------------------------------------------------
! IPSec Tunnel #1
! --------------------------------------------------------------------------------
! #1: IKE 設定
サイドメニュ- > VPN > IPsecトンネル > 新規作成のドロップダウン > IPsecトンネルを選択
※または、サイドメニュ- > VPN > IPsecウィザード
[VPN作成ウィザード] が表示されます
[テンプレートタイプ] から [カスタム] を選択します
VPNトンネルインターフェースの [名前] を入力します (名前は15文字以内であり、12文字以内がベストです): vpn-fffffffffffffffff-0
【注意】サンプル名としてなのか「vpn-fffffffffffffffff-0」が記載されていますが長すぎて設定不可、ここでは「vpn-to-aws-1」としておきます。所々で出てくるので、都度読み替えてください。
[新規VPNトンネル] ウィンドウが表示されます (ここでVPN設定を構成します)。
| セクション | 項目 | 設定値 | 備考 |
|---|---|---|---|
| ネットワーク | IPバージョン | IPv4 | |
| 〃 | リモートゲートウェイ | スタティックIPアドレス | |
| 〃 | IPアドレス | 1.1.1.1 | 外部IP AWS側 |
| 〃 | インターフェース | wan1 | AWSカスタマーゲートウェイで指定した固定グローバルIPを持つインターフェース |
| 〃 | ローカルゲートウェイ | ON > [指定]を選択 > wan1の固定グローバルIPを入力 | |
| 〃 | NATトラバーサル | ON or OFF | OFF=固定グローバルIP使用 ON=NAT/PAT デバイスの背後にFortigateが居る |
| 〃 | デッドピア検知 | オンアイドル or オンデマンド | デフォルト値:オンデマンド |
| 認証 | 方式 | 事前共有鍵 | |
| 〃 | 事前共有鍵 | xxxxSharedKeyxxxTunnel_1xxxxxxxx | |
| 〃 | IKE バージョン | 2 | |
| フェーズ1 プロポーザル | 暗号化 | AES128 | 「暗号化/認証」のセットが複数ある場合、使わないセットは「×」で閉じる |
| 〃 | 認証 | SHA1 | |
| 〃 | Diffie-Hellmanグループ | 2 のみにする | |
| 〃 | 鍵の有効時間(秒) | 28800 |
! NAT トラバーサルはデフォルトで有効になっていますが、FortiGate デバイスが NAT/PAT デバイスの背後にない場合は、NAT トラバーサルの選択を解除してください。
! --------------------------------------------------------------------------------
! #2: IPSec 設定
フェーズ2 セレクタ > 新規フェーズ2
| セクション | 項目 | 設定値 | 備考 |
|---|---|---|---|
| 新規フェーズ2 | 名前 | vpn-fffffffffffffffff-0 | 【注意】設定したVPNトンネルインターフェース名が自動入力されます。本記事では「vpn-to-aws-1」。 |
| 〃 | ローカルアドレス | サブネット、0.0.0.0/0.0.0.0 | FortigateのLAN サブネット VPNを通る通信に制限を掛けない場合は「0.0.0.0/0.0.0.0」で良い。 |
| 〃 | リモートアドレス | サブネット、0.0.0.0/0.0.0.0 | AWS側サブネット VPNを通る通信に制限を掛けない場合は「0.0.0.0/0.0.0.0」で良い。 |
高度な設定
| セクション | 項目 | 設定値 | 備考 |
|---|---|---|---|
| フェーズ2 プロポーザル | 暗号化 | AES128 | 「暗号化/認証」のセットが複数ある場合、使わないセットは「×」で閉じる |
| 〃 | 認証 | SHA1 | |
| 〃 | Replay Detectionを有効化 | ON | |
| 〃 | Perfect Forward Secrecy (PFS)を有効化 | ON | |
| 〃 | Diffie-Hellmanグループ | 2 のみにする | |
| 〃 | 鍵の有効時間 | 秒、3600 | |
| 〃 | オートネゴシエーション | ON | オートネゴシエーションが有効な場合、自動鍵キープアライブは自動的に有効になります |
[OK] をクリックする。
! --------------------------------------------------------------------------------
! #3: Tunnel Interface 設定
! トンネル インターフェイスは、トンネルに関連付けられた論理インターフェイスになるように構成されます。
! トンネル インターフェイスにルーティングされるすべてのトラフィックは暗号化され、VPC に送信されます。
! 同様に、VPC からのトラフィックは、このインターフェイスで論理的に受信されます。
!
!
! インターフェイスのアドレスは、カスタマー ゲートウェイのセットアップで構成されます。
! アドレスが変更された場合、カスタマー ゲートウェイと VPN 接続を Amazon VPC で再作成する必要があります。
!
! これは、gwdetect によるトンネル フェイルオーバーが機能するために必要です。
!
! これは、グローバル VDOM から実行します。
サイドメニュ- > ネットワーク > インターフェース > 物理インターフェース > wan1 を展開 > 作成したトンネルインターフェース を選択 > 編集
| セクション | 項目 | 設定値 | 備考 |
|---|---|---|---|
| アドレス | IP | 169.254.1.2 | 内部IP 機器側 |
| 〃 | リモートIP/ネットマスク | 169.254.1.1/30 | 内部IP AWS側 |
| 管理者アクセス | IPv4 | PING=ON | |
| その他 | ステータス | 有効化済み |
[OK] をクリックする。
! CLI からこれを実行して、トンネルに MTU と MSS を設定できます。
【注意】このCLIコマンドが弾かれて、トンネルインターフェースのMTU変更が出来ないから調べたら、FortiOS 6.4.0 以降ならできるらしいです(・・・このコマンドFortiOS 5.0版のVPNサンプル設定にも書いてるんだけどな)。
FortigateのVPNトンネルインターフェイスの MTUは、デフォルトで動的に計算されるようですし、いったん無視で良いかもしれません。※機会があればAWSへ問い合わせたい。
#--- Fortigate CLI ---#
# config global  # 【追記】不要コマンドなのでコメントアウトしました。
config system interface
#  edit "vpn-fffffffffffffffff-0" # この名前は、VPN トンネル名と同じになります
  edit "vpn-to-aws-1"  # 【追記】設定したVPNトンネルインターフェース名を指定。
    set mtu-override enable  # 【追記】 FortiOS 6.4.0 未満は設定不可
    set mtu 1427             # 【追記】 FortiOS 6.4.0 未満は設定不可
    set tcp-mss 1379
  next
end

show system interface vpn-to-aws-1  # 【追記】確認コマンド
! --------------------------------------------------------------------------------
! #4 Static Route 設定
カスタマー ゲートウェイは、対応するプレフィックスの静的ルートを設定する必要があります。
! トンネル インターフェイス経由でトラフィックを送信する VPC。
! プレフィックスが 10.0.0.0/16 の VPC の例を以下に示します。
!
! これはルート VDOM から構成されます。
【注意】ここは実際のVPC CIDRが記載されずに参考のCIDR [10.0.0.0/16] が書かれています。実際のVPC CIDRに書き換えてください。
また、実環境の構成によっては別途ルーティング設計が必要となります。
サイドメニュ- > ネットワーク > スタティックルート > 新規作成
| セクション | 項目 | 設定値 | 備考 |
|---|---|---|---|
| 新規スタティックルート | 宛先 | サブネット > VPC CIDRを記入 | 【注意】「10.0.0.0/16」は参考です。実際のVPC CIDRに書き換えてください。 |
| 〃 | インターフェース | vpn-to-aws-1 | 作成したVPNトンネル インターフェイスを指定 |
[OK] をクリックする。
! スタティック ルーティングでは、トンネル間のトラフィックのフェイルオーバーは許可されません。
! トンネルの 1 つに問題がある場合は、トラフィックを 2 番目のトンネルにフェイルオーバーします。 これは、fortigate で「gwdetect」を使用して行われます。
! gwdetect コマンドは、トンネルの反対側に ping を実行し、トンネルが稼働しているかどうかを確認します。
! ping が失敗すると、ルーティング テーブルからスタティック ルートが削除され、テーブルの 2 番目のルートがアクティブになります。
!
! これは、CLI を使用してのみ実行できます。
!
! 次の構成は、トンネルをテストするためにどの IP を ping する必要があるかを Fortigate デバイスに通知します。 この IP は、仮想プライベート ゲートウェイの内部 IP アドレスである必要があります。
!
! これは、gwtect を介したトンネル フェイルオーバーが機能するために必要です。
! さらに、トンネルがダウンするのを防ぐために VPN トンネルの側からトラフィックを送信する必要があるため、これはトンネルを維持するために必要です。
【注意】このCLIコマンドも弾かれて入力出来ませんでした。
VDOM(バーチャルドメイン)モード設定を変えてないと「config vdom」が打てないようですが、この設定をしなくても通信はできるので、私は無視しました。
将来、ここが詳しくなったら、、、、挑戦するかも(汗)
このCLIコマンドを使用しない代替案として、スタティックルートの優先度を変えれば良いと思います。
・Tunnel 1側のアドミニストレーティブ・ディスタンス = 10(優先、通常利用)
・Tunnel 2側のアドミニストレーティブ・ディスタンス = 11(非優先、Tunnel 1側Down時に利用)
config vdom
    edit root
        config router gwdetect
        edit 1
        set interface "vpn-fffffffffffffffff-0" ! これは VPN トンネル インターフェイスです。
        set server "169.254.1.1"

# 「set server 」は 内部IP AWS側 です。

# 次のコマンドを使用して、gwdetect の間隔と失敗時間を設定できます。
# 間隔は、ping 間の秒数です。
# Failtime は、連続して失われた ping の数です。
# 2 と 5 のそれぞれの値を使用すると、トンネルは 10 秒でフェールオーバーします。

        set interval 2
        set failtime 5
    next
end
! --------------------------------------------------------------------------------
! #5: Firewall Policy 設定
! ローカル サブネットから VPC サブネットへのトラフィック、およびその逆のトラフィックを許可するファイアウォール ポリシーを作成する。
! このポリシー例では、ローカル サブネットから VPC へのすべてのトラフィックを許可します。
!
! これはルート VDOM から構成されます。
サイドメニュ- > ポリシー&オブジェクト > IPv4ポリシー > 新規作成
| 項目 | 設定値 | 備考 |
|---|---|---|
| 名前 | 任意の名前 | 例)lan-to-aws-1 |
| 着信インターフェイス | internal や LAN等 | LAN側インターフェイス |
| 発信インターフェイス | vpn-to-aws-1 | 作成したVPN トンネル インターフェイス |
| 送信元 | all | |
| 宛先 | all | |
| スケジュール | always | |
| サービス | ALL | |
| アクション | ACCEPT | |
| NAT | ON or OFF | NATはデフォルト有効になっていますが、無効にすることができます。 |
[OK] をクリックする。
! ここで、逆方向のトラフィックを許可するポリシーを作成します
| 項目 | 設定値 | 備考 |
|---|---|---|
| 名前 | 任意の名前 | 例)aws-to-lan-1 |
| 着信インターフェイス | vpn-to-aws-1 | 作成したVPN トンネル インターフェイス |
| 発信インターフェイス | internal や LAN等 | LAN側インターフェイス |
| 送信元 | all | |
| 宛先 | all | |
| スケジュール | always | |
| サービス | ALL | |
| アクション | ACCEPT | |
| NAT | ON or OFF | NATはデフォルト有効になっていますが、無効にすることができます。 |
3.2. トンネル 2本目
! --------------------------------------------------------------------------------
! IPSec Tunnel #2
! --------------------------------------------------------------------------------
! #1: IKE 設定
サイドメニュ- > VPN > IPsecトンネル > 新規作成のドロップダウン > IPsecトンネルを選択
※または、サイドメニュ- > VPN > IPsecウィザード
[VPN作成ウィザード] が表示されます
[テンプレートタイプ] から [カスタム] を選択します
VPNトンネルインターフェースの [名前] を入力します (名前は15文字以内であり、12文字以内がベストです): vpn-fffffffffffffffff-1
【注意】サンプル名としてなのか「vpn-fffffffffffffffff-1」が記載されていますが長すぎて設定不可、ここでは「vpn-to-aws-2」としておきます。所々で出てくるので、都度読み替えてください。
[新規VPNトンネル] ウィンドウが表示されます (ここでVPN設定を構成します)。
| セクション | 項目 | 設定値 | 備考 |
|---|---|---|---|
| ネットワーク | IPバージョン | IPv4 | |
| 〃 | リモートゲートウェイ | スタティックIPアドレス | |
| 〃 | IPアドレス | 2.2.2.2 | 外部IP AWS側 |
| 〃 | インターフェース | wan1 | AWSカスタマーゲートウェイで指定した固定グローバルIPを持つインターフェース |
| 〃 | ローカルゲートウェイ | ON > [指定]を選択 > wan1の固定グローバルIPを入力 | |
| 〃 | NATトラバーサル | ON or OFF | OFF=固定グローバルIP使用 ON=NAT/PAT デバイスの背後にFortigateが居る |
| 〃 | デッドピア検知 | オンアイドル or オンデマンド | デフォルト値:オンデマンド |
| 認証 | 方式 | 事前共有鍵 | |
| 〃 | 事前共有鍵 | xxxxSharedKeyxxxTunnel_2xxxxxxxx | |
| 〃 | IKE バージョン | 2 | |
| フェーズ1 プロポーザル | 暗号化 | AES128 | 「暗号化/認証」のセットが複数ある場合、使わないセットは「×」で閉じる |
| 〃 | 認証 | SHA1 | |
| 〃 | Diffie-Hellmanグループ | 2 のみにする | |
| 〃 | 鍵の有効時間(秒) | 28800 |
! NAT トラバーサルはデフォルトで有効になっていますが、FortiGate デバイスが NAT/PAT デバイスの背後にない場合は、NAT トラバーサルの選択を解除してください。
! --------------------------------------------------------------------------------
! #2: IPSec 設定
フェーズ2 セレクタ > 新規フェーズ2
| セクション | 項目 | 設定値 | 備考 |
|---|---|---|---|
| 新規フェーズ2 | 名前 | vpn-fffffffffffffffff-1 | 【注意】設定したVPNトンネルインターフェース名が自動入力されます。本記事では「vpn-to-aws-2」。 |
| 〃 | ローカルアドレス | サブネット、0.0.0.0/0.0.0.0 | FortigateのLAN サブネット VPNを通る通信に制限を掛けない場合は「0.0.0.0/0.0.0.0」で良い。 |
| 〃 | リモートアドレス | サブネット、0.0.0.0/0.0.0.0 | AWS側サブネット VPNを通る通信に制限を掛けない場合は「0.0.0.0/0.0.0.0」で良い。 |
高度な設定
| セクション | 項目 | 設定値 | 備考 |
|---|---|---|---|
| フェーズ2 プロポーザル | 暗号化 | AES128 | 「暗号化/認証」のセットが複数ある場合、使わないセットは「×」で閉じる |
| 〃 | 認証 | SHA1 | |
| 〃 | Replay Detectionを有効化 | ON | |
| 〃 | Perfect Forward Secrecy (PFS)を有効化 | ON | |
| 〃 | Diffie-Hellmanグループ | 2 のみにする | |
| 〃 | 鍵の有効時間 | 秒、3600 | |
| 〃 | オートネゴシエーション | ON | オートネゴシエーションが有効な場合、自動鍵キープアライブは自動的に有効になります |
[OK] をクリックする。
! --------------------------------------------------------------------------------
! #3: Tunnel Interface 設定
! トンネル インターフェイスは、トンネルに関連付けられた論理インターフェイスになるように構成されます。
! トンネル インターフェイスにルーティングされるすべてのトラフィックは暗号化され、VPC に送信されます。
! 同様に、VPC からのトラフィックは、このインターフェイスで論理的に受信されます。
!
!
! インターフェイスのアドレスは、カスタマー ゲートウェイのセットアップで構成されます。
! アドレスが変更された場合、カスタマー ゲートウェイと VPN 接続を Amazon VPC で再作成する必要があります。
!
! これは、gwdetect によるトンネル フェイルオーバーが機能するために必要です。
!
! これは、グローバル VDOM から実行します。
サイドメニュ- > ネットワーク > インターフェース > 物理インターフェース > wan1 を展開 > 作成したトンネルインターフェース を選択 > 編集
| セクション | 項目 | 設定値 | 備考 |
|---|---|---|---|
| アドレス | IP | 169.254.2.2 | 内部IP 機器側 |
| 〃 | リモートIP/ネットマスク | 169.254.2.1/30 | 内部IP AWS側 |
| 管理者アクセス | IPv4 | PING=ON | |
| その他 | ステータス | 有効化済み |
[OK] をクリックする。
! CLI からこれを実行して、トンネルに MTU と MSS を設定できます。
【注意】このCLIコマンドが弾かれて、トンネルインターフェースのMTU変更が出来ないから調べたら、FortiOS 6.4.0 以降ならできるらしいです(・・・このコマンドFortiOS 5.0版のVPNサンプル設定にも書いてるんだけどな)。
FortigateのVPNトンネルインターフェイスの MTUは、デフォルトで動的に計算されるようですし、いったん無視で良いかもしれません。※機会があればAWSへ問い合わせたい。
#--- Fortigate CLI ---#
# config global  # 【追記】不要コマンドなのでコメントアウトしました。
config system interface
#  edit "vpn-fffffffffffffffff-1" # この名前は、VPN トンネル名と同じになります
  edit "vpn-to-aws-2"  # 【追記】設定したVPNトンネルインターフェース名を指定。
    set mtu-override enable  # 【追記】 FortiOS 6.4.0 未満は設定不可
    set mtu 1427             # 【追記】 FortiOS 6.4.0 未満は設定不可
    set tcp-mss 1379
  next
end

show system interface vpn-to-aws-2  # 【追記】確認コマンド
! --------------------------------------------------------------------------------
! #4 Static Route 設定
カスタマー ゲートウェイは、対応するプレフィックスの静的ルートを設定する必要があります。
! トンネル インターフェイス経由でトラフィックを送信する VPC。
! プレフィックスが 10.0.0.0/16 の VPC の例を以下に示します。
!
! これはルート VDOM から構成されます。
【注意】ここは実際のVPC CIDRが記載されずに参考のCIDR [10.0.0.0/16] が書かれています。実際のVPC CIDRに書き換えてください。
また、実環境の構成によっては別途ルーティング設計が必要となります。
サイドメニュ- > ネットワーク > スタティックルート > 新規作成
| セクション | 項目 | 設定値 | 備考 |
|---|---|---|---|
| 新規スタティックルート | 宛先 | サブネット > VPC CIDRを記入 | 【注意】「10.0.0.0/16」は参考です。実際のVPC CIDRに書き換えてください。 |
| 〃 | インターフェース | vpn-to-aws-2 | 作成したVPNトンネル インターフェイスを指定 |
[OK] をクリックする。
! スタティック ルーティングでは、トンネル間のトラフィックのフェイルオーバーは許可されません。
! トンネルの 1 つに問題がある場合は、トラフィックを 2 番目のトンネルにフェイルオーバーします。 これは、fortigate で「gwdetect」を使用して行われます。
! gwdetect コマンドは、トンネルの反対側に ping を実行し、トンネルが稼働しているかどうかを確認します。
! ping が失敗すると、ルーティング テーブルからスタティック ルートが削除され、テーブルの 2 番目のルートがアクティブになります。
!
! これは、CLI を使用してのみ実行できます。
!
! 次の構成は、トンネルをテストするためにどの IP を ping する必要があるかを Fortigate デバイスに通知します。 この IP は、仮想プライベート ゲートウェイの内部 IP アドレスである必要があります。
!
! これは、gwtect を介したトンネル フェイルオーバーが機能するために必要です。
! さらに、トンネルがダウンするのを防ぐために VPN トンネルの側からトラフィックを送信する必要があるため、これはトンネルを維持するために必要です。
【注意】このCLIコマンドも弾かれて入力出来ませんでした。
VDOM(バーチャルドメイン)モード設定を変えてないと「config vdom」が打てないようですが、この設定をしなくても通信はできるので、私は無視しました。
将来、ここが詳しくなったら、、、、挑戦するかも(汗)
このCLIコマンドを使用しない代替案として、スタティックルートの優先度を変えれば良いと思います。
・Tunnel 1側のアドミニストレーティブ・ディスタンス = 10(優先、通常利用)
・Tunnel 2側のアドミニストレーティブ・ディスタンス = 11(非優先、Tunnel 1側Down時に利用)
config vdom
    edit root
        config router gwdetect
        edit 2
        set interface "vpn-fffffffffffffffff-1" ! これは VPN トンネル インターフェイスです。
        set server "169.254.2.1"

# 「set server 」は 内部IP AWS側 です。

# 次のコマンドを使用して、gwdetect の間隔と失敗時間を設定できます。
# 間隔は、ping 間の秒数です。
# Failtime は、連続して失われた ping の数です。
# 2 と 5 のそれぞれの値を使用すると、トンネルは 10 秒でフェールオーバーします。

        set interval 2
        set failtime 5
    next
end
! --------------------------------------------------------------------------------
! #5: Firewall Policy 設定
! ローカル サブネットから VPC サブネットへのトラフィック、およびその逆のトラフィックを許可するファイアウォール ポリシーを作成する。
! このポリシー例では、ローカル サブネットから VPC へのすべてのトラフィックを許可します。
!
! これはルート VDOM から構成されます。
サイドメニュ- > ポリシー&オブジェクト > IPv4ポリシー > 新規作成
| 項目 | 設定値 | 備考 |
|---|---|---|
| 名前 | 任意の名前 | 例)lan-to-aws-2 |
| 着信インターフェイス | internal や LAN等 | LAN側インターフェイス |
| 発信インターフェイス | vpn-to-aws-2 | 作成したVPN トンネル インターフェイス |
| 送信元 | all | |
| 宛先 | all | |
| スケジュール | always | |
| サービス | ALL | |
| アクション | ACCEPT | |
| NAT | ON or OFF | NATはデフォルト有効になっていますが、無効にすることができます。 |
[OK] をクリックする。
! ここで、逆方向のトラフィックを許可するポリシーを作成します
| 項目 | 設定値 | 備考 |
|---|---|---|
| 名前 | 任意の名前 | 例)aws-to-lan-2 |
| 着信インターフェイス | vpn-to-aws-2 | 作成したVPN トンネル インターフェイス |
| 発信インターフェイス | internal や LAN等 | LAN側インターフェイス |
| 送信元 | all | |
| 宛先 | all | |
| スケジュール | always | |
| サービス | ALL | |
| アクション | ACCEPT | |
| NAT | ON or OFF | NATはデフォルト有効になっていますが、無効にすることができます。 |
! 追加の注意事項と質問
! - Amazon Virtual Private Cloud Getting Started Guide:
http://docs.amazonwebservices.com/AmazonVPC/latest/GettingStartedGuide
! - Amazon Virtual Private Cloud Network Administrator Guide:
http://docs.amazonwebservices.com/AmazonVPC/latest/NetworkAdminGuide